Compiling from the source code
Contents
Compiling from the source code#
Downloading the Godot fork#
The first step in compiling the game from scratch is to download and compile the game engine it runs on - Godot. Godot is a free and open-source 2D and 3D game engine, and it has all the functionality we need to make the game, except for one…
At this point, if you’ve used Godot in the past, you might be wondering “wait, if it uses Godot, can’t we just download Godot from the website and import the project?”. Not quite, because we’ve needed to add our own little bit of code on top of vanilla Godot, so to compile the game we need to download and compile a modified version of Godot. If you’re interested as to why we’ve modified Godot, see Why did you fork Godot?.
To download the modified Godot, you’ll need to have git installed on your
computer (this will come in useful later as well). Then you can use this
command in a terminal to download the fork of Godot:
git clone --depth 1 --recursive https://github.com/drwhut/godot.git -b tabletop-3.4.5
Note
The version number after -b tabletop refers to the Godot version the
modified code is based on. You might need to change which version of Godot
to download if you’re planning on downloading a specific version of
Tabletop Club, as different versions of Tabletop Club might use different
versions of Godot.
If you just plan on downloading the current master branch from
Tabletop Club, then you don’t need to change the above command.
If you know which version of Tabletop Club you want to download, check this
page in it’s documentation and look for a command similar to the one above.
Then, replace what comes after the -b above with what the documentation
says. This way, you know you’re compiling a compatible version of Godot for
the Tabletop Club version you want.
Tip
If you are struggling to compile Godot, or you simply don’t want to, there are pre-built binaries of the Godot fork you can download from its GitHub repository. Once it is running, you can then skip straight to Downloading Tabletop Club.
Please note that these builds are not officially supported, as they are artifacts from the fork’s GitHub Actions rather than the official pipeline. Because of this, it is recommended to compile Godot from source instead if at all possible.
Compiling Godot#
The way you compile Godot’s source code is exactly how you would normally compile Godot, the documentation of which can be found here. For convenience, the instructions from the Godot documentation has been taken, modified slightly, and put here for each platform 1.
For all platforms, you will need at least the following:
Python 3.5+. Make sure Python is added to your
PATHenvironment variable.SCons 3.0+. Once you have Python installed, you can install it by opening a terminal/command prompt and running:
python -m pip install scons
You can check to see whether you have installed Python and SCons correctly by running:
python --version
scons --version
Compiling Godot for Windows#
Requirements#
To compile Godot for Windows, you’ll also need the following:
Visual Studio Community version 2017 or later. You’ll need to install it with C++ support - if you’ve already installed Visual Studio without C++ support, you can re-run the installer and click Modify to install the C++ tools.
MinGW-w64 with GCC can be used as an alternative to Visual Studio. You’ll need to configure it to use the
posixthread model.
Compiling#
To compile the engine, open a command prompt, change to the root directory of
the engine code (using cd), and run:
scons -j8 platform=windows target=release_debug
Note
The -j8 means that SCons will use eight threads to compile Godot.
To make compiling faster, it’s best to have this number be the same as the
number of logical cores in your CPU.
If it compiles successfully, the result binary will be put in godot/bin/
with the name godot.windows.opt.tools.32.exe or
godot.windows.opt.tools.64.exe. By default, SCons will build a binary
matching your CPU architecture, but this can be changed by adding bits=64
or bits=32 to the above command.
Creating a Visual Studio project#
If you want to create a Visual Studio solution for compiling Godot instead
(which can come in handy if you plan to modify the Godot source code), you can
run SCons with the vsproj=yes parameter added:
scons -j8 platform=windows vsproj=yes
Building an export template#
If you want to compile an export template to export a release build of the game from the editor, you can use the following comamnd:
scons -j8 platform=windows target=release tools=no production=yes
Compiling Godot for macOS#
Requirements#
To compile Godot for macOS, you’ll also need Xcode.
Compiling#
Start a terminal and go to the root directory of the engine code.
To compile for Intel (x86_64) CPUs, use:
scons platform=osx arch=x86_64 target=release_debug --jobs=$(sysctl -n hw.logicalcpu)
To compile for Apple Silicon (ARM64) CPUs, use:
scons platform=osx arch=arm64 target=release_debug --jobs=$(sysctl -n hw.logicalcpu)
To support both architectures in a single “Universal 2” binary, run the above
two commands, then use lipo to bundle them together:
lipo -create bin/godot.osx.opt.tools.x86_64 bin/godot.osx.opt.tools.arm64 -output bin/godot.osx.opt.tools.universal
If it compiles successfully, the result binary will be put in godot/bin/.
To create an .app bundle like in the official builds, you need to use the
template provided in misc/dist/osx_tools.app:
cp -r misc/dist/osx_tools.app ./Godot.app
mkdir -p Godot.app/Contents/MacOS
cp bin/godot.osx.opt.tools.universal Godot.app/Contents/MacOS/Godot
chmod +x Godot.app/Contents/MacOS/Godot
Building an export template#
If you want to compile an export template to export a release build of the game from the editor, you can use the following commands:
scons platform=osx arch=x86_64 target=release tools=no production=yes --jobs=$(sysctl -n hw.logicalcpu)
scons platform=osx arch=arm64 target=release tools=no production=yes --jobs=$(sysctl -n hw.logicalcpu)

lipo -create bin/godot.osx.opt.x86_64 bin/godot.osx.opt.arm64 -output bin/godot.osx.opt.universal

cp -r misc/dist/osx_template.app ./osx_template.app
mkdir -p osx_template.app/Contents/MacOS
cp bin/godot.osx.opt.universal osx_template.app/Contents/MacOS/godot_osx_release.64
chmod +x osx_template.app/Contents/MacOS/godot_osx_release.64

zip -r osx.zip osx_template.app
Compiling Godot for Linux / *BSD#
Requirements#
To compile Godot for Linux and other Unix systems, you’ll also need the following:
GCC 7+ or Clang 6+.
pkg-config.
X11, Xcursor, Ximerama, Xi and XRandR development libraries.
MesaGL development libraries.
ALSA development libraries.
PulseAudio development libraries.
Distro-specific one-liners#
Alpine Linux |
apk add scons pkgconf gcc g++ libx11-dev libxcursor-dev libxinerama-dev libxi-dev libxrandr-dev \
    libexecinfo-dev
|
Arch Linux |
pacman -S --needed scons pkgconf gcc libxcursor libxinerama libxi libxrandr mesa glu libglvnd \
    alsa-lib pulseaudio yasm
|
Debian / Ubuntu |
sudo apt-get install build-essential scons pkg-config libx11-dev libxcursor-dev libxinerama-dev \
    libgl1-mesa-dev libglu-dev libasound2-dev libpulse-dev libudev-dev libxi-dev libxrandr-dev yasm
|
Fedora |
sudo dnf install scons pkgconfig libX11-devel libXcursor-devel libXrandr-devel libXinerama-devel \
    libXi-devel mesa-libGL-devel mesa-libGLU-devel alsa-lib-devel pulseaudio-libs-devel \
    libudev-devel yasm gcc-c++ libstdc++-static
|
FreeBSD |
sudo pkg install scons pkgconf xorg-libraries libXcursor libXrandr libXi xorgproto libGLU alsa-lib \
    pulseaudio yasm
|
Gentoo |
emerge -an dev-util/scons x11-libs/libX11 x11-libs/libXcursor x11-libs/libXinerama x11-libs/libXi \
    media-libs/mesa media-libs/glu media-libs/alsa-lib media-sound/pulseaudio dev-lang/yasm
|
Mageia |
urpmi scons task-c++-devel pkgconfig "pkgconfig(alsa)" "pkgconfig(glu)" "pkgconfig(libpulse)" \
    "pkgconfig(udev)" "pkgconfig(x11)" "pkgconfig(xcursor)" "pkgconfig(xinerama)" "pkgconfig(xi)" \
    "pkgconfig(xrandr)" yasm
|
OpenBSD |
pkg_add python scons llvm yasm
|
openSUSE |
sudo zypper install scons pkgconfig libX11-devel libXcursor-devel libXrandr-devel libXinerama-devel \
        libXi-devel Mesa-libGL-devel alsa-devel libpulse-devel libudev-devel libGLU1 yasm
|
NetBSD |
pkg_add pkg-config py37-scons yasm
For audio support, you can optionally install |
Solus |
sudo eopkg install -c system.devel scons libxcursor-devel libxinerama-devel libxi-devel \
    libxrandr-devel mesalib-devel libglu alsa-lib-devel pulseaudio-devel yasm
|
Compiling#
To compile the engine, open a terminal, change to the root directory of the engine code, and run:
scons -j8 platform=x11 target=release_debug
Note
The -j8 means that SCons will use eight threads to compile Godot.
To make compiling faster, it’s best to have this number be the same as the
number of logical cores in your CPU.
If it compiles successfully, the result binary will be put in godot/bin/
with the name godot.x11.opt.tools.32 or godot.x11.opt.tools.64.
By default, SCons will build a binary matching your CPU architecture, but this
can be changed by adding bits=64 or bits=32 to the above command.
Note
If you want to compile using Clang instead of GCC, use this command:
scons -j8 platform=x11 target=release_debug use_llvm=yes
Building an export template#
If you want to compile an export template to export a release build of the game from the editor, you can use the following commands:
scons -j8 platform=x11 target=release tools=no production=yes
strip bin/godot.x11.opt.64
Downloading Tabletop Club#
To download the Tabletop Club Godot project, you can either download a
compressed copy of the source code for a particular version from the releases page on GitHub and extract
it, or if you’re feeling very adventurous, you can download the latest source
code on the master branch by running this command:
git clone --depth 1 https://github.com/drwhut/tabletop-club.git
Downloading the WebRTC GDNative plugin#
Since the multiplayer for Tabletop Club uses WebRTC, you’ll need to download the WebRTC plugin for Godot. You can follow these instructions to setup the plugin:
Download the latest release (not a pre-release!) of the plugin from the repository. Make sure to download the
webrtc-native-releasefile rather than thewebrtc-native-debugfile.Open the compressed file, and place the
webrtc/folder intotabletop-club/game/. Afterwards, there should be a file attabletop-club/game/webrtc/webrtc.tres.
Running Tabletop Club in the Godot editor#
To open Godot’s project manager, run the executable you compiled in
godot/bin/. You can then import the project by clicking the
Import button and selecting the tabletop-club/game/project.godot
file. Now you can open the project and play the game by pressing the play
button in the top-right corner (or by pressing F5)!
At this point, you can modify the game to your heart’s content! Have a look at the scenes and scripts, try tweaking things here and there, or maybe try and add some stuff of your own?
Exporting the game#
You can export the game with the editor to make it so you don’t need to run the game through the editor to play it. Here’s how you can export the project:
Click on Project > Export…
In the pop-up, click Add…, and select your platform.
In the menu on the right, set the debug template to point to the editor executable, and if you made a release template, set that as well.
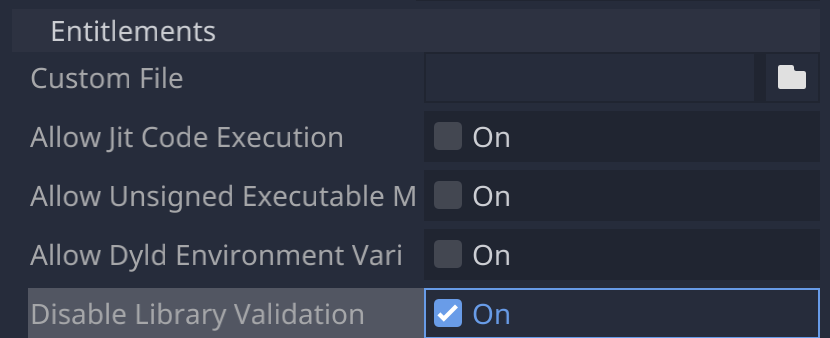
Note
If you are on macOS, then you will need to disable library validation as shown below. This is in order to prevent the system from checking the WebRTC library, which stops it from loading.
Click Export project, choose where you want to export the project and whether you want to export a debug or a release binary, then click Save.
Copy the
tabletop-club/assets/folder next to the exported binary, so the game has assets to import.Note
On macOS, you’ll need to put this folder inside the
.apppackage, specifically inTabletop Club.app/Contents/Resources.
Now, you should be able to launch the exported executable and play the game directly!
Why did you fork Godot?#
There’s actually just one reason for this: there was a feature that I knew existed in Godot, but it was not exposed to the in-built scripting language GDScript, and the functionality wasn’t included in release templates.
When the game starts, the first thing it does is it scans certain folders for asset packs, and if it finds any, the game will then import assets from those packs. The way the game imports assets is almost identical to how Godot imports assets in the editor. It’s possible because of a custom module I made that takes advantage of the importing code that already exists for the editor, and it allows me to import assets like textures and 3D models from anywhere on the filesystem using just one function in GDScript.
However, a problem occured when compiling Godot with this module as a release template - the compiled editor code was not included in the release templates, so the custom module had no idea what “importing” meant. This meant I had to tweak some of the editor code and the SCons build script to include the importing code in release builds, while stopping compiler/runtime errors from happening since the code was suddenly disconnected from the rest of the editor.
Footnotes
- 1
The Godot documentation is from Juan Linietsky, Ariel Manzur and the Godot community, and it is licensed under the CC-BY 3.0 License.